

How To Remove An Appliance Garage
Nothing spoils the look of a beautiful kitchen like a countertop cluttered with pocket-size appliances. Furthermore, zip is more annoying than dragging the toaster out of a cabinet every forenoon for a crispy English muffin. Enter the bully blueprint fence of form versus function. Should you desire to take your cake and swallow it besides, (wow we're really in the kitchen now), then building this DIY-friendly apparatus garage is a must. With a cut list that tin can be sized to fit any infinite (we provide both our measurements and piece of cake formulas to find your ain!), and door slides that push back into the cabinet when not in employ, you're sure to enjoy your perfectly toasted muffin followed by a quick close of the doors to hide it all away.
Note: A door slide is a hinge that opens and then slides the door back along the within of the cabinet wall. This blazon of hardware can exist a bit pricy ($42 per attack Amazon). If that seems steep, we've created the DIY version explained in steps 13-20. Though the door doesn't slide dorsum quite as smoothly as with the fancy hardware, it'due south a viable cost-saving option. Alternatively, you could skip the door slide altogether and opt for regular swinging doors using cheap full-inset hinges like this.
Cost: $70
Time: 4 ½ hours
Difficulty: Moderate. The layering of sparse boards to create the paneled walls and doors is like shooting fish in a barrel, but creating tight joints requires precision cuts.
(2) ¼-inch Plywood – Get 2 2×4 human foot project panels to complete the side and door panels and the inside walls and backing lath.
(4) 1x2x8 Boards to frame the walls and make the crosspieces and terminate block.
(5) ¼x3x4 Boards to trim the walls and doors.
(3) ½x2x4 Boards to frame to doors.
(i) two×4 Board to support the inside walls.
(ii) Cabinet Knobs
(four) Total Overlay Hinges
Wood Glue
Wood Filler
Sandpaper
Primer and Paint
Cabinet Dimensions: 30″ W x xviii″ H x 12″ D
View our Cut Listing Worksheet and Lath Planning Sail
Walls
1×2 Wall Frame (stiles) – iv @ 18 inches
1×2 Wall Frame (rails) – four @ viii ¼ inches
¼ inch Plywood Wall Panel – 2 @ 11 ¼" W x 18″ H
¼ x 3 Wall Trim (stiles) – 4 @ eighteen inches
¼ x iii Wall Trim (rail) – four @ 6 ¼ inches
Doors
½ x 2 Door Frame (stiles) – iv @ 16 iii/viii inches
½ x 2 Door Frame (rails) – 4 @ x 3/8 inches
¼ inch Plywood Door Panels – 2 @ x ¼" W x thirteen ¼" H
¼ 10 3 Door Trim (stiles) – 4 @ 16 3/viii inches
¼ x 3 Door Trim (track) – 4 @ viii iii/viii inches
Within Walls
2×four Inside Walls Supports – 4 @ x ½ inches
¼ inch Plywood Inside Wall Panels – 2 @ ten ½" W ten 17 ¼" H
Miscellaneous
one×2 Crosspieces – 6 @ 27 ½ inches
1×ii Face Frame Legs – two @ 18 inches
1×ii Face Frame Height – one @ 27 inches
¼ inch Plywood Backing – one @ 27 ½" West x 17¼" H
1×2 End Cake – ane @ 4 inches
Steps
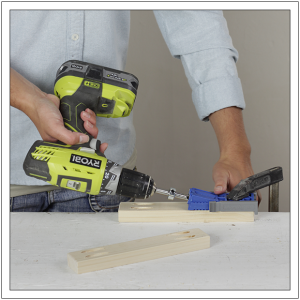
1. Prep the Parts
Measure your space, and and then use our handy Cut List Worksheet and Board Planning Guide to decide the size of your boards. Using a miter saw, cut the parts to size. Drill two pocket holes in each end of the 1×two crosspieces, the shorter ¼ x ii frame pieces for the doors, and the shorter one×2 frame pieces for the side walls using a Kreg Jig, every bit shown. Be sure to readjust the Kreg Jig between materials. Sand the parts to remove whatsoever burs from cutting.
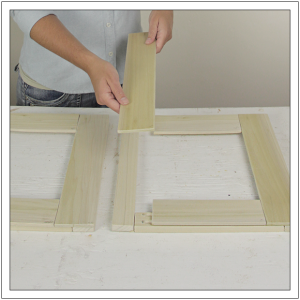
 2. Assemble the Wall Frames
Utilise wood glue to the ends of the shorter 1×two wall frame pieces, and then lay them between the longer pieces. Use a clamp to concur each joint in place before driving 1 ¼ inch Kreg screws though the pilot holes to concur the parts in identify. Repeat to create the second frame.
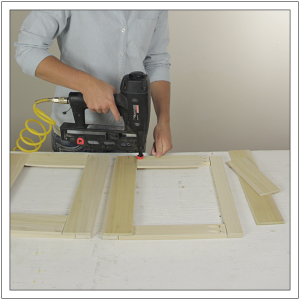
iii. Attach the Wall Panels
Apply a bead of wood glue to the surface of each frame. Position the wall panel over the frame, covering the Kreg Jig holes. Using a pneumatic blast gun and 5/viii inch finish nails, secure the panel in place. Repeat to assemble the second wall frame and panel.
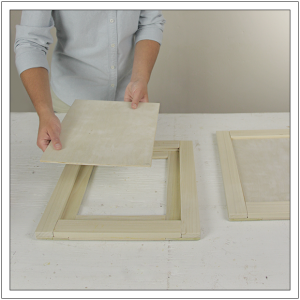
4. Attach the Wall Trim
Apply a bead of glue to the perimeter of the confront of each console, and and then lay the ¼ x iii wall trim pieces in place and so that the shorter pieces set up between the longer pieces. Conform the pieces until they're flush with the edges of each panel. Using a nail gun a five/eight inch finish nails, boom through the trim pieces and into the perimeter of the panels so that the nails sink through the console and into the i×two frame. Be conscientious to avert the locations of the pocket hole screws.
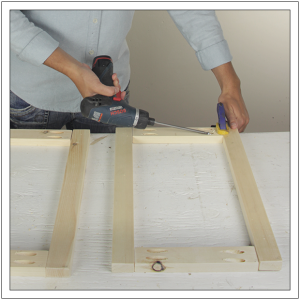
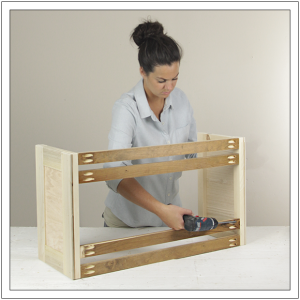
5. Add Crosspieces to the Back
Stand up the assembled walls upright, trim facing outward. Using 1 ¼ inch Kreg Screws, secure the four crosspieces between the side walls flush with their back edges. For reference, place a crosspieces flush with the top edge of each wall, 1 affluent with the bottom border of each walls, and the other two 2 ¾ from the top and bottom edges. (Note: Pardon the dark forest. I'm using salvaged boards for this function of the projection.)
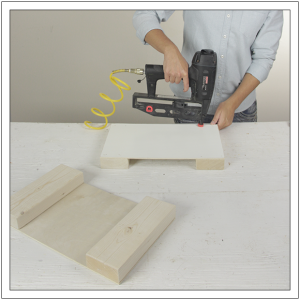
6. Add Crosspieces to the Top
Adhere two additional crosspieces flush with the peak edges of the walls; one affluent with the front edge, and the other towards the back of the assembly about an inch from the dorsum crosspiece.
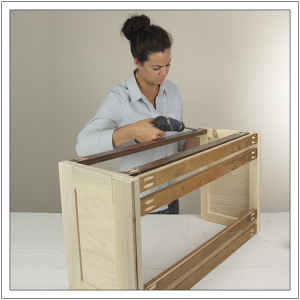
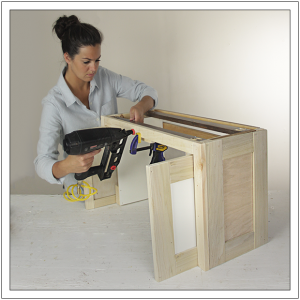
7. Secure the Face Frame
Utilize a bead of wood mucilage to the front edge of each wall. Position the outside edge of each leg of the face frame flush with the face up of the side wall, and and so secure it by shooting one ¼ inch terminate nails through the leg and into the front edge of each wall. Apply wood mucilage to the front edge of the crosspiece, position the remaining piece of the face up frame between the vertical legs, and blast it in place affluent with the top edge of the legs. (Note: The photo shows the eye piece attached first, but I found it would almost likely be easier to attach the legs beginning.)
8. Assemble the Door Frames
The frames of the doors gather much similar the walls, except that the panels fix inside the frame to hide the cut edge. To create the door frames, lay the shorter ½ x 2 pieces between the longer pieces and secure using forest glue, clamps and 1 inch Kreg Screws.
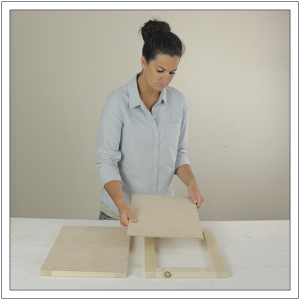
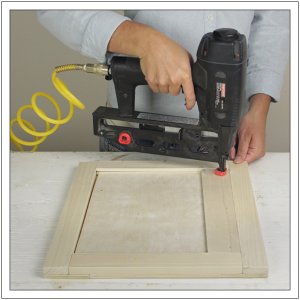
9. Position the Door Trim
Apply wood gum to the surface of each frame. Place the ¼ 10 iii trim pieces on the frame so that the shorter pieces ready between the longer pieces and flush with the edges of the frame, equally shown.
10. Attach the Door Trim
Using a nail gun, shoot 5/8 inch nails through the ¼-inch-thick trim and into the ½-inch-thick frame.
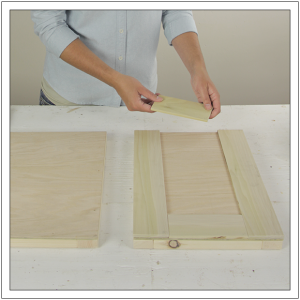
11. Insert the Door Panels
Flip the assembled doors trim-side-down on the piece of work surface. Utilise a bead of woods mucilage to the exposed back of the trim pieces. Identify the panels face up down onto the ledge.
12. Adhere the Swivel Support
Place the ¼ x 3 inch hinge back up block on the back of each door panel. Position the board so that it is tight against the outside edge of each panel. Nail the board in place on each door using a nail gun a 5/8 inch finish nails.
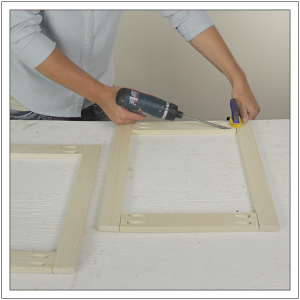
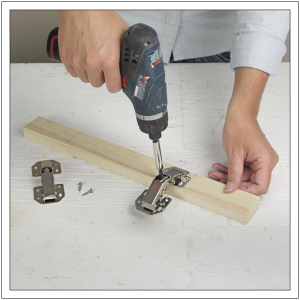
xiii. Create the Slider Cake
Mark the slider block 3 ¾ inches from each end. Identify the panel side of each swivel affluent with the edge of the block and within the line equally shown. Drill pilot holes and attach the hinges using the screws provided.
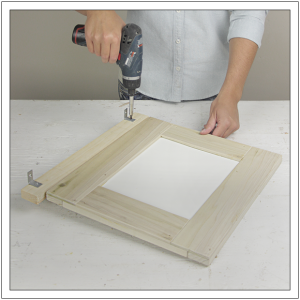
14. Attach the Hinges to the Door
Position each door flush with the bottom edge of its slider block. Using the instructions provided with the hinges, position an even gap betwixt the door and the slider block. Drill pilot holes and adhere the hinges to the doors using the provided screws.
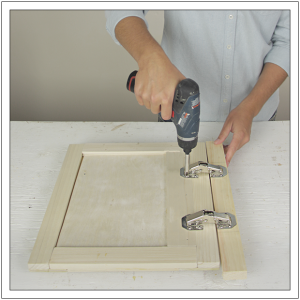
15. Attach the Fifty-brackets
Flip the doors hinge-side-down. On the confront of each slider block, position an 50-subclass ¾ inch from each end and affluent with the outside edge. Using a drill driver and 5/eight inch wood screws attach each L-bracket. These brackets will slide along the inside edges of the wall frame to keep the door from tipping equally it slides.
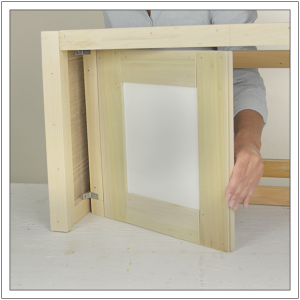
16. Dryfit the Doors
Tip the doors nether the confront frame and against the side walls. Position the sliders so that the Fifty-brackets sit inside each of the wall's ane×2 frame pieces. If the L-brackets don't slide smoothly along the inset of the frame, reposition the brackets every bit needed. Remove the door until installation in step 19.
17. Build the Within Walls
Position two two×4 boards flush with the top and bottom edges of the ¼ inch inside wall panel. Using a boom gun and i ¼ inch finish nails, attach the panel to the 2x4s. Repeat to create the 2nd inside wall.
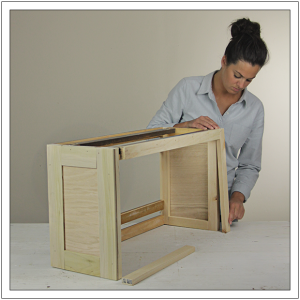
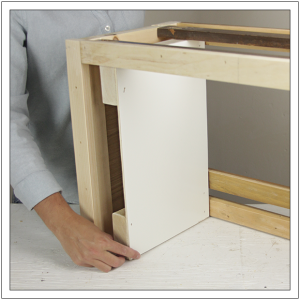
18. Dryfit the Within Walls
Tip the within walls under the face frame and into place. With the panels facing outward, position the 2x4s 1 ¼ inch from each wall. Mark the placement on the crosspieces and remove the inside walls.
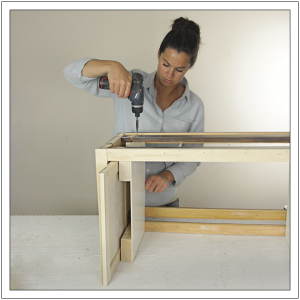
xix. Secure the Doors and Inside Walls
Slide the doors dorsum into place, and then position the inside walls. Using a drill driver and i ¼ inch screws (I merely used the Kreg Screws from before), secure the inside walls by driving screws through the crosspieces and into 2x4s.
twenty. Attach the Stop Block
Marking the eye of the cease block and the center of the face frame. Marshal the centerlines and clamp the cake in place behind the face up frame. Using a blast gun, secure the block by nailing through the face frame and into the block using 1 ¼ inch finish nails.
MORE Edifice PLANS
Source: https://build-basic.com/build-a-diy-appliance-garage/
0 Response to "How To Remove An Appliance Garage"
Post a Comment